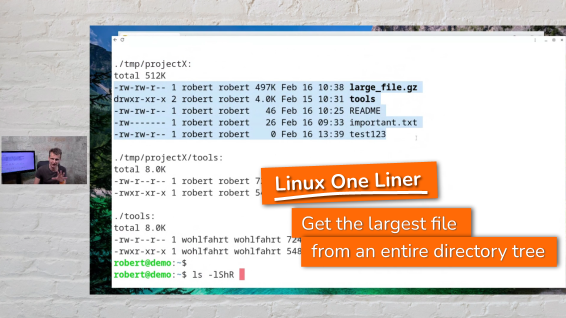
The Linux one-liner of the day - Find the largest file from an entire directory tree
The Linux one-liner of today answers a simple sounding question:
What is the largest file within an entire directory tree?
Answering this is not as straightforward as it may sound at first. But with a clever combination of easy to understand command line tools (aka. with a “one liner”), it’s solvable in seconds.
Are you ready? So let’s go.
Imagine a filled up disk. And imagine you want to free up some space. And for this, you want to start with the largest file on this disk.
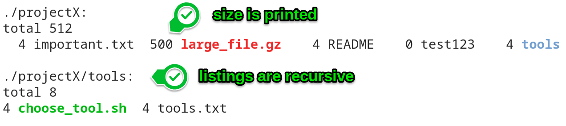
The first tool that comes to mind for showing and handling the size of files is the tools “ls”: If you call "ls -l" within a directory, you see the disk space occupied by each individual single file.
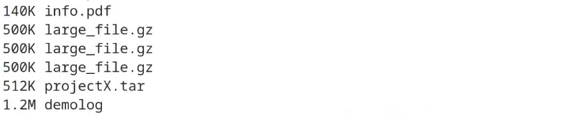
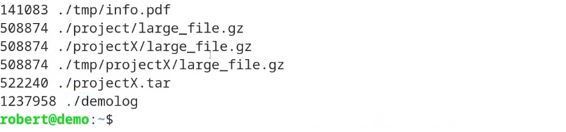
I bet you know an output like this …
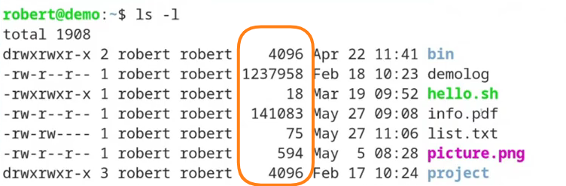
… where the 5th column shows you the size of every single file. (there are a few files more within this directory, I’m showing only the first seven here)
Now let’s add two command line options to ls - just to see the largest file from this list in a convenient way: The two switches "-h" and "-S".
The first of the two, the "-h" command line switch, gives you the output of the file-sizes in a “human readable” format. That means you no longer have to count the digits showing you the numbers of bytes. Instead you’ll see the sizes in an easy readable way like “1.2M” for instance.
The second command line switch "-S" (that’s an uppercase “S”) does all the “heavy lifting” for sorting the files by their size.
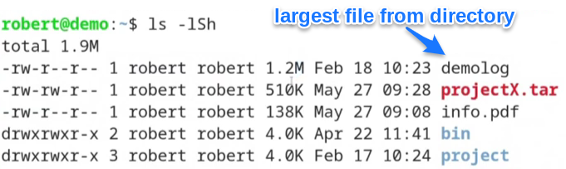
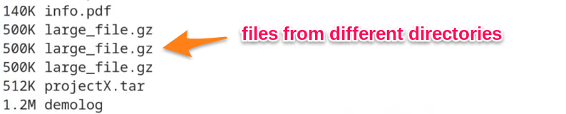
As you see, the largest file in the current directory here is the file “demolog” with a size of 1.2MB. (again - there are a few more files within this directory, I’m showing only the first lines of output here)
But this is only the largest file within the single current directory.
As you can see in the screenshot, there are a few other directories contained within the current directory (“bin” and “project” are shown here). And these directories surely could contain files larger than the largest file we found till now …
So, how can we include the files from these sub-directories into our search too?
How can we find the largest file recursively from an entire directory tree?
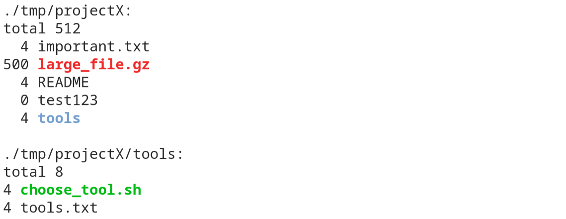
First approach: Use “ls” to list files recursively
First, let’s try to stick with the “ls” command.
If you have used this command for a while, then you certainly know about the "-R" command line switch. This command line option instructs “ls” to list entire directory trees recursively.
So - with this parameter appended to the last command line, we see - beside all the files within the current directory - the files contained in the sub-directories.
… together with the files in the sub-directories of the sub-directories, together with the files of the sub-directories of the sub-directories of the ….
ls -lShR
This will give us an output like the following (again, I only show a few lines of output here):
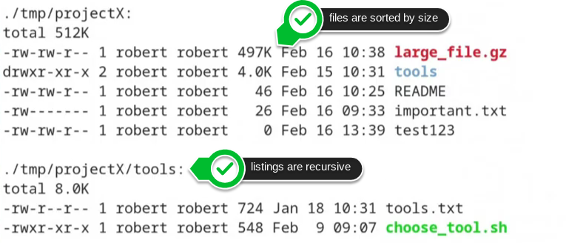
From the result of this command line, three things can be seen:
- files are listed recursively (great!)
- files are sorted by size (perfect!)
- BUT: the sorting only takes place within each directory on its own. (DUH!)
So the approach with “ls” is great for listing files recursively. But sorting all the files together by size needs to be done in a different way.
And if it comes to sorting something at the Linux command line, then the tool “sort” is the tool to go …
Sorting the files by size with “sort”
The command “sort” is a tool that helps you to sort text based data. And it can do this in different ways - for instance alphabetically or numerically.
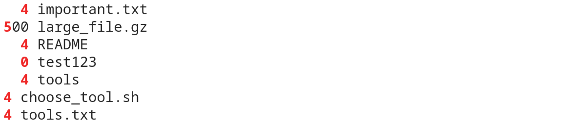
To help sort a little bit, let’s generate the output of “ls” in a more “machine readable” way.
First: Let’s print out only the filename and the size.
This can be done by calling “ls” without this “-l” switch that shows all these details of the individual files. Instead let’s print out only the information we need: The name of each file and its size.
While the filename is printed out by default, the parameter "-s" instructs “ls” to print out the size of every file too. (Take care, that the "-s" here is now a lowercase one)
ls -Rs
this will give you an output like the following:
And to make the output data even better “machine readable”, we could simply force the output of “ls” in one single column - just by appending "-1" (this is the digit one):
ls -Rs1
Now the output data is reformatted like this:
This looks promising. We are only two steps away from our perfectly sorted list:
First, we need to remove all the lines from the output we are not interested in.
And second: Use “sort” to sort the files by size.
Use “grep” to filter the output only for the lines we are interested in
For sorting we are only interested in those lines that contain the name of a file together with its size. All the other lines from the output are not of interest for us right now.
To filter the output only for the needed lines, we can use the “grep” command together with a really simple regular expression that matches only lines starting with a number.
I’ve marked the regular expression in the following screenshot:

If you are not familiar with regular expression, here is a very short explanation of the one used here:
The regular expression '^ *[0-9]' means, that we are searching for lines with the following characteristics:
- ^ … first, there is the start of the line (we need this to “anchor” the following part of the expression)
- <space>* … then there is a space any number of times (even zero spaces)
- [0-9] … and then there shall be a digit from the range 0-9
In other words: We are searching for lines, where the line starts - perhaps indented a few spaces - with a number.
A resulting output that looks like this can later easily be sorted with sort:
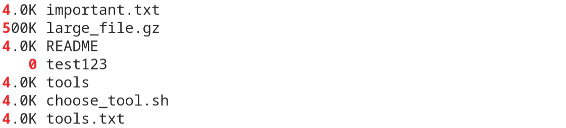
If we wanted to, we could even add the lovely "-h" command line switch to “ls” again, to see the sizes in the “human readable” format”.
ls -Rs1h | grep '^ *[0-9]'
With this output format, the lines we are interested in still start with a number, so that our regular expression still works like before:
The last step with this approach would be to sort the output. That simply means, to “pipe” the whole filtered output we have through the “sort” command.
One important thing to note here is to add the command line switch "-h" for the sort command too.
This lets sort do the sorting according to the generated “human readable” sizes:
ls -Rs1h | grep '^ *[0-9]' | sort -h
And now that we see, the last file in this output is the already known file “demolog”, we could simply say “mission accomplished!”
BUT WAIT! What about the file-paths?
Mission accomplished? Not really!
What, if the largest file were located within a different directory than the current one. We would not be able to tell from this output, where the file is located in the directory tree.
Our current solution doesn’t print out the path for every file - only the bare names:
So we need a different solution. A better one!
A better solution with “find”
The better solution would be to use the tool “find” instead of “ls” to list all the files recursively.
This command is a tool that, by default, searches recursively entire directory trees for files matching the conditions you specify.
For our use case, the condition could be as simple as "-type f". Which means we are only interested in regular (aka “normal”) files.
find -type f
And if you do not specify a path where find shall search within, find simply searches the current directory and the files we see are the same as with the recursive “ls”:
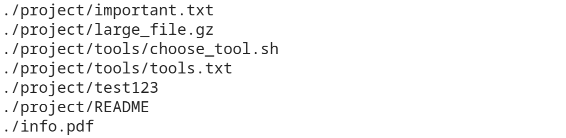
But this time we see the complete path for every single file.
Now we just need to add the size of every file to the output of “find” and then sort the data according to our needs.
Add the file sizes to the output of find
The easiest way to see the size of every file “find” prints out would be to use the output formatting of find.
If you have a look into the manual page of find, you’ll see that there is a command line option "-printf <format>" that lets you describe how the output “find” generates shall look like.
Within the format string of “-printf” you can use the placeholder "%p" for instance, which references the path of the file. And with "%s" we add the second information we need to the output too: the size of the file:

Pay attention to the appended line-break “\n” at the end of the format-string. Without this, “find” would simply print out all the information separated by spaces. So the result would be everything within one single very long line …
With the command line shown above, the resulting output looks perfect for our purpose:
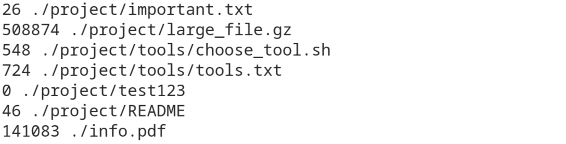
… every single line consists of the path to a file and its size.
The last steps are now:
- sort the output numerically
- take only the last line (the line containing the largest file)
- and as a bonus: extract from this last line only the file-path
Sort the output again with sort
This time we have plain numbers we want to use for sorting, therefore we need the"-n" option here for the “numerical sort”:
find -type f -printf "%s %p\n" | sort -n
Here are the last lines from the output this command gives me on my demo system:
The next step is to extract only the last line from this output.
How to do this? Let’s use the “tail” command …
Get only the last line from the output with “tail”
The command “tail” can be used if you only need some lines from the end of a file or data stream.
By default, “tail” prints out the last 10 lines it sees. If you need a different number of lines, add the "-n N" command line switch, where N is the number of lines you wanna see.
So to get only the single last line of our file listing, we add "| tail -n 1" to our prepared command line:

This looks pretty cool. Both - the output and the command line on its own 😉
BONUS: Get only the name and path of the largest file
If we take the task literally, we still haven’t created the perfect solution: The task was to get the largest file - and not its size!
So let’s extract the filename from the last remaining line.
How? Glad you ask 🙂
This last bonus-step is really easy to implement with our prepared data. We just need to split the line at the single space character: The second field of this split is the filename we are interested in.
Splitting data that is separated with a single character can easily be done at the Linux command line with the command "cut":
What you see is, that I’ve appended the “cut” command with a pipe sign (this is the "|") to the command line we already have.
The two important parameters we use for “cut” here are the following:
- -d “ “ … that says to “cut”, that we want to split the line at single spaces
- -f 2 … and this means that we are only interested in the second part of the line
The perfect solution to search within any given directory
With our current implemented command line, the “find” command lists all the files contained in the directory we are currently in.
If we want to search in a different directory than the current one, we can just add a new first parameter to the “find” command line. This parameter then specifies the directory we want to search within.
find <directory> -type f ...
But pay attention, that the directory you wanna search in has to be on the command line before the other parameters we use here.
To demonstrate the functionality, let’s do a last search here - this time for the directory “/etc”.
And just because some directories under /etc need root-permissions to be listed, I start the “find” command with the help of “sudo” here:

and now …
Mission Accomplished!
Here is what to do next

If you followed me through this article, you certainly have realized that knowing some internals about how things are working at the Linux command line, can save you a lot of time and frustration.
And sometimes it’s just fun to leverage these powerful mechanics.
If you wanna know more about such “internal mechanisms” of the Linux command line - written especially for Linux beginners
have a look at “The Linux Confidence Framework”
In this framework I guide you through 5 simple steps to feel comfortable at the Linux command line.
This framework comes as a free pdf and you can get it here.
Wanna take an unfair advantage?

If it comes to working on the Linux command line - at the end of the day it is always about knowing the right tool for the right task.
And it is about knowing the tools that are most certainly available on the Linux system you are currently on.
To give you all the tools for your day-to-day work at the Linux command line, I have created “The ShellToolbox”.
This book gives you everything
- from the very basic commands, through
- everything you need for working with files and filesystems,
- managing processes,
- managing users and permissions, through
- software management,
- hardware analyses and
- simple shell-scripting to the tools you need for
- doing simple “networking stuff”.
Everything in one single, easy to read book. With explanations and example calls for illustration.
If you are interested, go to shelltoolbox.com and have a look (as long as it is available).