Get to know your linux-system - Step 3
In this third step of “Get To Know Your Linux-System”, we wanna examine the diskspace a system uses.
And disk space - this is the number one resource if it comes to unplanned outages.
I would say - at least one time a month - a customer of mine has a problem related to a completely filled up disk space somewhere.
… and this then leads to
- user complains
- services that stop working
- and it may even lead to data loss.
Yes - this hasn’t to be a problem if we had a decent monitoring in place - but this is a completely different story.
What you will learn:
Let me show you in this lesson,
- how to get insights into the used disk-space
… and as much important like this …
- how to examine where - in which directories and by which files - all the disk space is consumed.
Let’s start with the df command
If you are on a system and you wanna see the used - or better the still free diskspace - use the command df.
The name of this short command stands for “disk free” - very easy to remember I think.
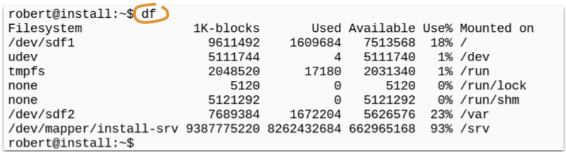
The df command gives you as output a table that shows you, which filesystems the system uses and how much they are filled up.
A much better readable output of the used diskspace you will get with the additional “-h” parameter.
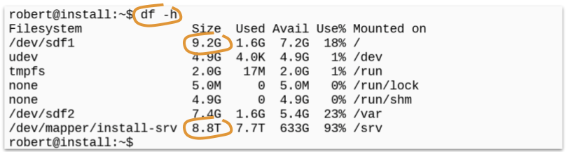
“df -h” gives you the same table with the same filesystems, but now the sizes of the filesystem and the used diskspace is calculated into a “human readable” format. (therefore the commandline switch -h … as a abbreviation of “humane readable”).
And as a result of using this switch, you’ll see now gigabytes and terabytes instead of only huge numbers of blocks…
The filespace often consists of multiple disks or partitions
To understand the shown table completely, we have to talk a little bit about how disks space is made available to a linux-system.
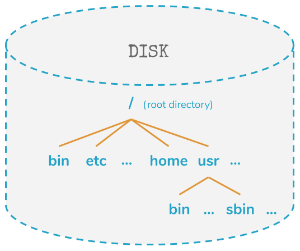
First - each linux-system has a root-directory with the name “/”. This simple slash is the name of the directory from which every diskspace our system has is reachable … by simply switching directories.
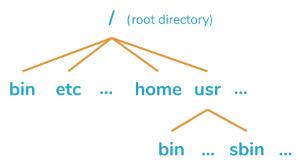
Yes - on linux systems there is nothing like a drive-letter or multiple drive-letters like on windows-systems: Instead, everything we have here is one single directory-tree - starting at the root-directory “/”.
So - ok - every system has this root-filesystem. And this filesystem is created at install-time and it is typically located on a disk build into the system.
And this root-filesystem can be extended.
It can be extended by simply making an additional disk available.
And these additional disks aren’t available via drive letters - like you might have seen it on windows systems. Instead these additional disks are connected into your system via an existing directory.
So - to make an additional disk available for a linux system - a new directory (or folder, if you prefer this name) is created and the additional disk is presented within this directory.
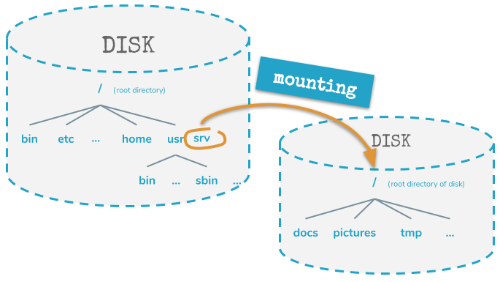
The phrase for this “adding additional disks into an existing directory” is “mounting”.
You can mount an additional disk into any existing directory. This directory is typically empty before you mount the additional disk into it. It could contain data before doing the mount - but this data won’t be available anymore until you unmount the disk later again.
Who mounts this additional disks?
The mounting of additional disks - or the mounting of single partitions into the central filesystem of a linux-system - is sometimes done by the installer - to simply give you an optimized disk-layout for a special use-case.
And sometimes, this mounting is done by the admin of a system - to better organize the needed diskspace.
You may ask
Why the hell should you mount additional partitions or disks into the main filesystem. Why not simply take a larger disk?
Glad you ask :-)
Well - the first and obvious reason is, that there simply isn’t a larger disk available. Or a system is already installed and running for quite some time - but now - in this moment - you need to make more space available without reinstalling the whole system. Then you have to add an additional disk into an existing filesystem.
The second reason is - and I think this is the more common reason:
you want to separate disk areas from other disk areas
What do I mean by that?
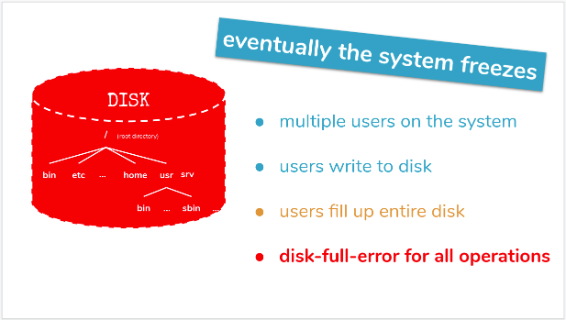
Well - simply take a scenario, where there are multiple users working on the same system. And if you have many users on a system - you cannot control their diskspace-usage completely.
So let’s imagine:
Every user writes his data to disk and doesn’t mind the overall free disk-space.
What will happen?
Yes - eventually your system disk is filled up to 100% - and every file or datablock written to the disk will result in a disk-full-error.
This means - not only the users aren’t able to write any more data to disk - but also all the other services on the system will get this disk-full-errors.
And eventually your system will perhaps freeze und you will have a hard time to get it running again.
The disk-layout for a more stable system
And now imagine a different disk layout: Not one single disk for the whole filesystem - but one disk for the main-directory (the root filesystem) and a different disk (or a different partition) for the data that will be written by the individual users.
The diskspace of the system will be separated from the diskspace that is available to the users .
In this scenario - if the users fill up their disk space - then obviously the users cannot write any more files or data to disk - but the rest of the system - all the other services and the log-daemons - they won’t be affected by this.
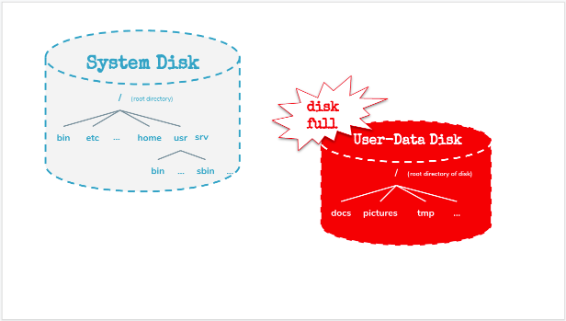
The users where only able to fill up the disk or partition that was dedicated to them.
… much better than a fully filled up system disk!
Where are the users-files located?
To give the users their very own disk space - you have to know where the user’s files are typically written to.
If you are on an unmodified linux-system - then the only place where users can persistently store their data - is their home-directory which is located within the directory “/home”.
So if you mount an additional disk into the directory /home - then you have separated the disk space the users on your system use for storage from the disk space the rest of your system uses and needs.
You have made your system more stable!
The same approach can be used not only for users on your system - but also for services like databases or … file server services.
Everytime - when services on your system store data to disk - and you don’t have enough control over the amount of disk space these services need … then best practice is, to take the directory where these services write data into and place this directory onto a separate disk or partition.
In this way - if a service needs way more disk space as intended - the service only fills up its own disk space and does not affect all the other running services.
GREAT!
ok - so we know that the disk space of our system often consists of more than one single disk or partition. And the output of the df command shows you all of them. You see one single line for every mounted filesystem.
Don’t get confused by the pseudo filesystems
But pay attention here: not every line represents a mounted disk or partition: Many linux-systems make heavy use of pseudo filesystems: This are filesystems that typically don’t exists on a real disk but they are used by the linux-kernel to present useful data to userspace-processes.
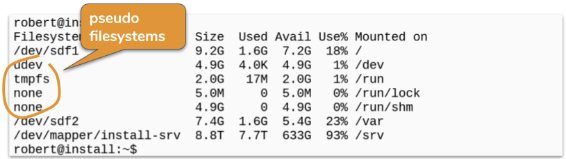
Think of this pseudo filesystems as a sort of ramdisk you typically don’t have to care about.
Take care of the filesystems with names starting with “/dev/
But what you have to care about are the filesystems or partitions whose name starts with /dev. This is typically an unmistakable sign for a real filesystem on a disk or partition.
Disks are typically named /dev/sda or /dev/sdb, /dev/sdc and so on. These names are the so called device-files for disks. You will see them directly, if you use the ls command to get a list of files within the /dev directory.
If these disks contain partitions - and typically they do - then they are named like the corresponding disk with the number of the partition appended.
So you could have for instance a disk /dev/sda and on this disk a partition represented by the device-file /dev/sda1
If you examine the output of the df-command - concentrate on the lines where the name of the mounted filesystem or partition starts with /dev/.
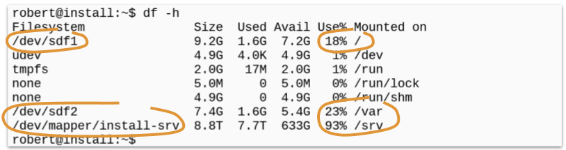
These are all the currently mounted disks or partitions - and if they are full - you have to act.
List all available partitions, not just the mounted once
If you wanna see all the disks or partitions that are available on your system - and not just the mounted ones - use the command “fdisk” with the commandline-switch “-l” - this stands for list.
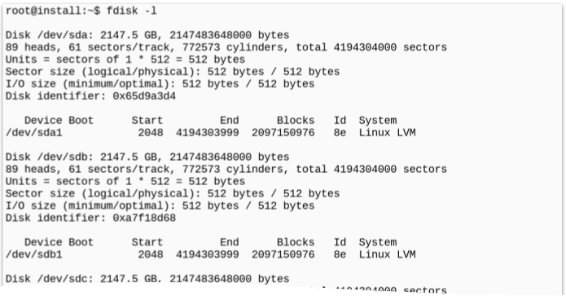
If you run this command as root (fdisk -l) then you will get an overview over all the disks and partitions visible to the system.
And if you wanna have a more convenient output or list - try to run a command named “lsblk”. This command stand for something like “list all the available block devices” (lsblk) and some distributions come with this command preinstalled.

Where is all the diskspace used?
And finally - if you see a filled up disk or partition - you probably want to know where exactly all the disk-space has gone.
For this, you should use the disk-usage command “du” - again a command written with only two letters.
If you call this command without any additional parameter - it will give you a list of all the files and directories within the current directory.
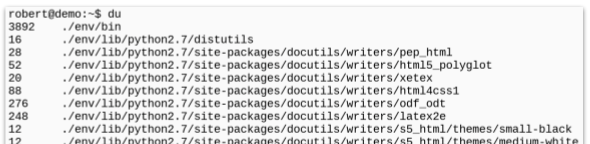
Not very useful at first glance …
But if used wisely - it can show you exactly where you have to search for the wasted space.
How? Ok - let me show you …
First - always use the two command-line switches “-h” and “-s”.
While “-h” here again stands for the “human readable” format - the “-s” parameter stands for “sum up”.
You already know the human readable format from the df- command. So if you call du with “-h” - you will always see how many megabytes or gigabytes are used by certain files or directories - instead of only seeing huge numbers of used blocks …
The -s commandline switch let the du-command sum-up the used disk-space occupied by single directories - instead of traversing through every subdirectory it finds …
And of course - like with many other commands - you can combine these two commandline-switches into a single parameter -sh.
Ok - so first: Always use the “du”-command with the parameter -sh.
Second - don’t let you show all the files and directories
… instead let the du-command sum up for you exactly one-directory level of the folder you are currently examining.
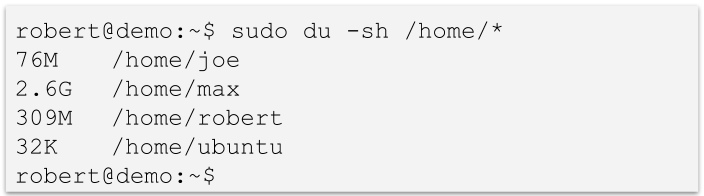
So if you for instance know, that the disk mounted to your home-directory is 100% filled up - then you wanna know, in which sub-directory (or file) directly within the /home-directory most of the disk-space is used.
To get this information - simply call the “du -sh” command with the additional parameter /home/* - in this way, you will get a really comfortable list with all files and directories directly within the /home-directory together with the occupied disk space.
Third - sort the list
If the shown list is long, then you perhaps wanna sort the output to get a faster overview: To accomplish this, use the sort-command. As the name already says - the sort command helps you to sort some data - for instance the output of a command.
And the sort-command is smart enough, to also sort output containing the “human readable” format the du-command gives us. If you call the sort-command also with the “-h” commandline-switch.
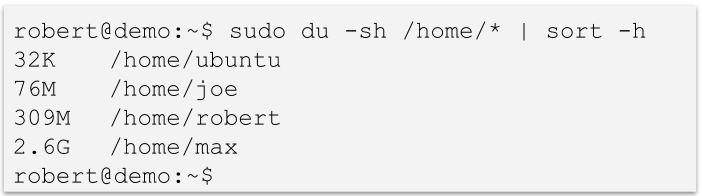
To sort the output of du - just feed it’s output via the pipe-sign (this is the vertical bar) straight through the sort-command.
So your commandline will look just like this:
du -sh /home/* | sort -h
And the result is a perfectly sorted list of all directories and files directly in /home, sorted by the used disk space.
Step-By-Step to the used disk space
And if this
du -sh /home/* | sort -h
shows you for instance, that the home-directory of max - the directory /home/max - contains the vast majority of the occupied disk-space, you can simply modify the commandline, to now show everything directly within the folder /home/max and pipe everything again through the sort-command.
du -sh /home/max/* | sort -h
And if you use the du command this way - you can always build up a picture - step-by-step - where all the used disk space has gone ….
I hope you enjoyed this lesson.
See you next time
Here is what to do next

If you followed me through this article, you certainly have realized that knowing some internals about how things are working at the Linux command line, can save you a lot of time and frustration.
And sometimes it’s just fun to leverage these powerful mechanics.
If you wanna know more about such “internal mechanisms” of the Linux command line - written especially for Linux beginners
have a look at “The Linux Confidence Framework”
In this framework I guide you through 5 simple steps to feel comfortable at the Linux command line.
This framework comes as a free pdf and you can get it here.
Wanna take an unfair advantage?

If it comes to working on the Linux command line - at the end of the day it is always about knowing the right tool for the right task.
And it is about knowing the tools that are most certainly available on the Linux system you are currently on.
To give you all the tools for your day-to-day work at the Linux command line, I have created “The ShellToolbox”.
This book gives you everything
- from the very basic commands, through
- everything you need for working with files and filesystems,
- managing processes,
- managing users and permissions, through
- software management,
- hardware analyses and
- simple shell-scripting to the tools you need for
- doing simple “networking stuff”.
Everything in one single, easy to read book. With explanations and example calls for illustration.
If you are interested, go to shelltoolbox.com and have a look (as long as it is available).